Quick start
From the PAROL6 you have just built to one that is homed and moves on command, on one page. It assumes the robot is assembled and wired as in the Build guide (Mechanical assembly, Electronics and wiring), and nothing more: no firmware uploaded yet, no software on your PC, and no experience with Python or a terminal. Every step ends with a link to the page that explains it; follow it when a step is not clear or something fails.
Read first
PAROL6 has no brakes: when the power goes, the arm falls. It has pinch points, it moves fast, and it moves by itself while homing. Anchor it to the table, keep the E-stop within reach, keep hands out of the arm's path, and read the Safety chapter: it is five minutes long.
1. What you need
| Where to get it | |
|---|---|
| Your PAROL6, assembled and wired, with the control board inside the base | the Build guide; the parts in the BOM, or as kits from the shop |
| A 24 V power supply, 5 A | the BOM names one; any 24 V 5 A supply works. A closed one with a mains cable needs no mains wiring (The power supply) |
| A mains switch within reach, on the supply's mains side: a switched socket strip will do | it is the stop that still works when the PC software has frozen (Emergency stop) |
| An E-stop, a normally closed button on the base | the BOM names one; any NC switch works |
| A USB cable, type B, to the PC | |
| An ST-Link programmer and the programming adapter, to upload the firmware once | the programming adapter in the shop |
| A PC with Windows, Linux or macOS | see the minimum PC |
Read in more detail: What you need.
2. Anchor the robot
Bolt the base to the table through its six holes, or clamp it to the edge. A free-standing PAROL6 tips over when it extends.
Check
Push the top of the base sideways, firmly: it must not lift or slide.
Read in more detail: Mounting the robot.
3. Install Python and Git, and open a terminal
The PC software is written in Python, and Git downloads it. A terminal is the window where you type commands: type one line, press Enter, wait until it finishes.
- Download Python 3.11.9 from python.org: the "Windows installer (64-bit)". 3.11.9 is the last 3.11 release with an installer.
- Run it. On its first screen tick Add python.exe to PATH, then press Install Now.
- Download Git from git-scm.com and install it with the settings it proposes.
- Open a terminal: press the Windows key, type
cmdand press Enter. A black window opens. - Type
python --versionand press Enter, thengit --version.
The commands on this page start with cd %USERPROFILE%\Documents, which takes the terminal to your Documents
folder. If Windows answers that it cannot find the path, your Documents folder is kept in OneDrive: type
cd %USERPROFILE%\OneDrive\Documents instead. To open a terminal in any folder, open the folder in File
Explorer, click the address bar, type cmd and press Enter.
- Open a terminal: Ctrl+Alt+T on Ubuntu, or Terminal in the applications menu.
- Install Git:
sudo apt install git(it asks for your password). - The software needs Python 3.11: the commander runs on 3.10 or 3.11 only, the Python API on 3.11 or newer. Ubuntu's own Python is 3.10 on Ubuntu 22.04 and 3.12 on Ubuntu 24.04, so install 3.11 next to it, with its virtual environments and its window toolkit:
- Type
python3.11 --versionand press Enter, thengit --version. Each program below gets its own virtual environment made with Python 3.11; inside it,pythonis that Python 3.11.
- Download Python 3.11.9 from python.org: the "macOS 64-bit universal2 installer". Run it.
- Open a terminal: press Cmd+Space, type
Terminaland press Enter. - Install Git with the Xcode command line tools: type
xcode-select --install, press Enter and confirm the window that opens. - Type
python3.11 --versionand press Enter, thengit --version. Each program below gets its own virtual environment made with Python 3.11; inside it,pythonis that Python 3.11.
Check
The terminal answers Python 3.11 and a number, and git version and a number. If it says a command is not
found, install that program again (on Windows, tick Add python.exe to PATH), then open a new terminal.
4. Upload the main firmware
A control board from the shop comes with the test firmware, which turns all six motors as soon as the board starts. Put the main firmware on it before you switch on the assembled robot. You do this once.
- Download the robot repository into your
Documents folder:
On Linux and macOS, the first line is
cd %USERPROFILE%\Documents git clone https://github.com/Source-Robotics/PAROL6-Desktop-robot-arm.gitcd ~/Documents. - Install VS Code. Open it, click the Extensions icon on the left, search for PlatformIO IDE and install it. Restart VS Code when it asks.
- On Windows, install the ST-Link driver: in File Explorer, open
PAROL6-Desktop-robot-armin your Documents folder, right-clicken.stsw-link009.zip, choose Extract All, and rundpinst_amd64.exefrom the extracted folder. - Unplug the 24 V supply from the robot. Plug the programming adapter onto the 2×5 header next to the USB port, and the ST-Link into the PC. The adapter powers the board's microcontroller, not the motors.
- In VS Code: File, Open Folder, and choose
PAROL6 control board main softwareinsidePAROL6-Desktop-robot-arm. The first time, PlatformIO downloads its tools for a few minutes: wait until the bar at the bottom is quiet. - Click the → arrow (Upload) in the bar at the bottom of VS Code.
- When it has finished, unplug the programming adapter.
Check
The terminal at the bottom of VS Code ends with SUCCESS. If not, see the Firmware
page and Control board troubleshooting.
Read in more detail: Firmware · Firmware and first run.
5. Install the robot software
Choose one, or install both: the commander software is a window with buttons, a program editor and a 3D
simulator; the Python API drives the robot from Python programs you write. Each one goes into its own folder
with its own virtual environment (.venv), a private copy of Python for that program: the two need different
versions of the same packages, so they cannot share one.
In the terminal, download the commander software, make its virtual environment and install what it needs (a few minutes):
cd %USERPROFILE%\Documents
git clone https://github.com/Source-Robotics/PAROL-commander-software.git
cd PAROL-commander-software
python -m venv .venv
.venv\Scripts\activate
python -m pip install -r requirements.txt
On Linux and macOS:
cd ~/Documents
git clone https://github.com/Source-Robotics/PAROL-commander-software.git
cd PAROL-commander-software
python3.11 -m venv .venv
source .venv/bin/activate
python -m pip install -r requirements.txt
After the activate line the prompt starts with (.venv).
In the terminal, download the Python API, switch to version 0.9.1, make its virtual environment and install it (a few minutes):
cd %USERPROFILE%\Documents
git clone https://github.com/PCrnjak/PAROL6-python-API.git
cd PAROL6-python-API
git checkout v0.9.1
python -m venv .venv
.venv\Scripts\activate
python -m pip install .
On Linux and macOS:
cd ~/Documents
git clone https://github.com/PCrnjak/PAROL6-python-API.git
cd PAROL6-python-API
git checkout v0.9.1
python3.11 -m venv .venv
source .venv/bin/activate
python -m pip install .
After the activate line the prompt starts with (.venv). Git reports a "detached HEAD" after the checkout:
that is expected.
Check
The install ends without an ERROR line. If one appears, see Commander installation
or Python API installation.
6. Connect
- The E-stop to the two E-stop terminals on the base. Without it the robot will not run.
- The USB cable to the PC.
- The 24 V supply to the power connector, and the supply's mains plug into the switched socket strip, or behind the mains switch, within your reach. Nothing happens yet: the board is off until the button is pressed. A DIN-rail supply is wired and checked first (The power supply).
Read in more detail: Connecting.
7. Switch on
Hold the arm by the forearm and press the power button on the base. The motors energise, you hear six clicks, and the arm holds its position. Let go.
Check
Six drivers initialise and the arm supports itself before you let go. If it does not, use First power-on: if nothing happens.
Read in more detail: First power-on · Switching on and off.
8. Start the software
First find the robot's serial port, the name the PC gives the USB connection:
- Windows: open Device Manager (right-click the Start button), then Ports (COM & LPT): the robot is a "USB
Serial Device" with a number, for example
COM5. - Linux:
ls /dev/ttyACM*in the terminal, usually/dev/ttyACM0. If the software later reports "permission denied", runsudo usermod -aG dialout $USER, then log out and in again. - macOS:
ls /dev/cu.usbmodem*in the terminal.
For the first run, write the port into the program. Open
PAROL-commander-software/GUI/files/Serial_sender_good_latest.py in a text editor (VS Code: File,
Open File) and find these lines near the top:
8 with the number of your port, 5 for COM5. On Linux, 0 is /dev/ttyACM0; change
it if yours has another number. Save the file. Then start the program in the terminal:
cd %USERPROFILE%\Documents\PAROL-commander-software
.venv\Scripts\activate
cd GUI\files
python Serial_sender_good_latest.py
cd ~/Documents/PAROL-commander-software
source .venv/bin/activate
cd GUI/files
python Serial_sender_good_latest.py
COM5 on Windows, ttyACM0 on Linux) and press Connect, more than once if the first try
fails.
- Start the controller, the program that talks to the robot, with your port, and leave its terminal open:
On Linux and macOS:
cd ~/Documents/PAROL6-python-API, thensource .venv/bin/activate, thenparol6-server --serial /dev/ttyACM0(macOS: the/dev/cu.usbmodem…name). - Open a second terminal and activate the same virtual environment in it:
(Linux and macOS:
cd ~/Documents/PAROL6-python-API,source .venv/bin/activate,python.) The prompt changes to>>>: Python now runs each line you type. Type these three lines: Keep this second terminal open: the next steps type into it.
Read in more detail: The commander software · The Python API.
Check
The commander's response log shows the robot's data, or ping() answers with hardware_connected=True. If
it does not, use Communication troubleshooting.
9. Jog each joint
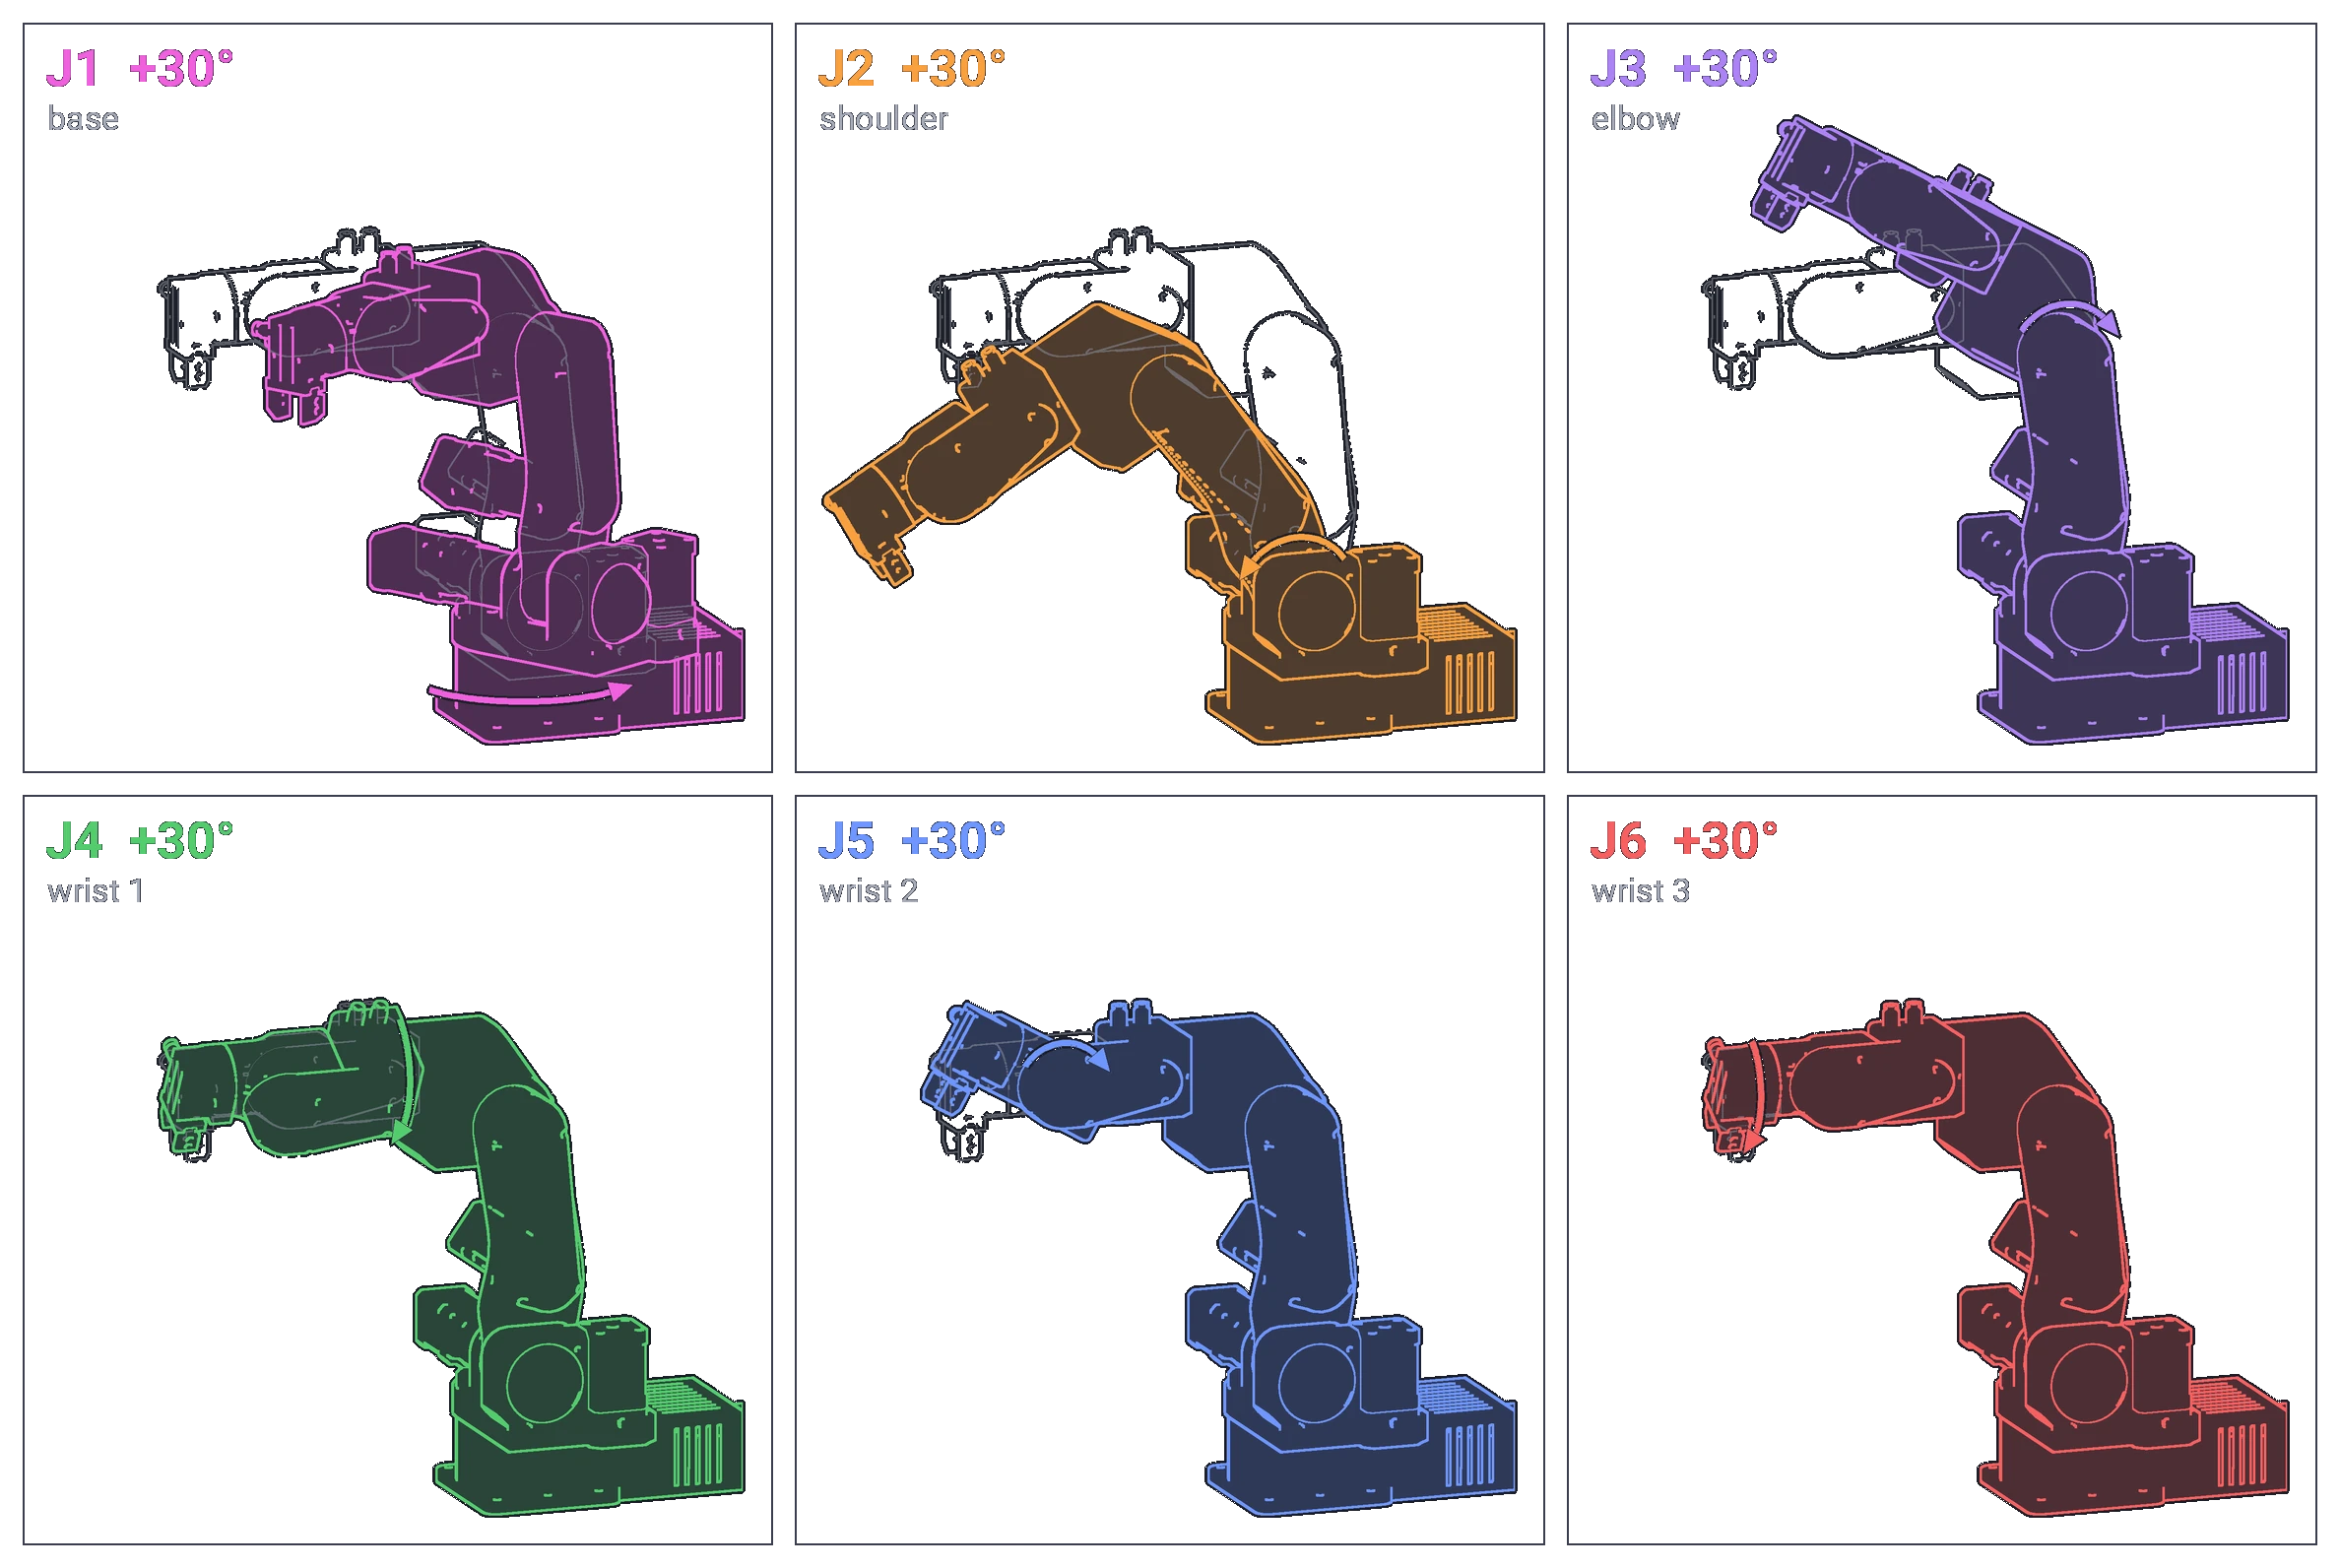
Before homing, check that every joint turns the way the software thinks it does: each one briefly, a few degrees. The figure shows each joint's positive direction, in colour, over the pose in grey.
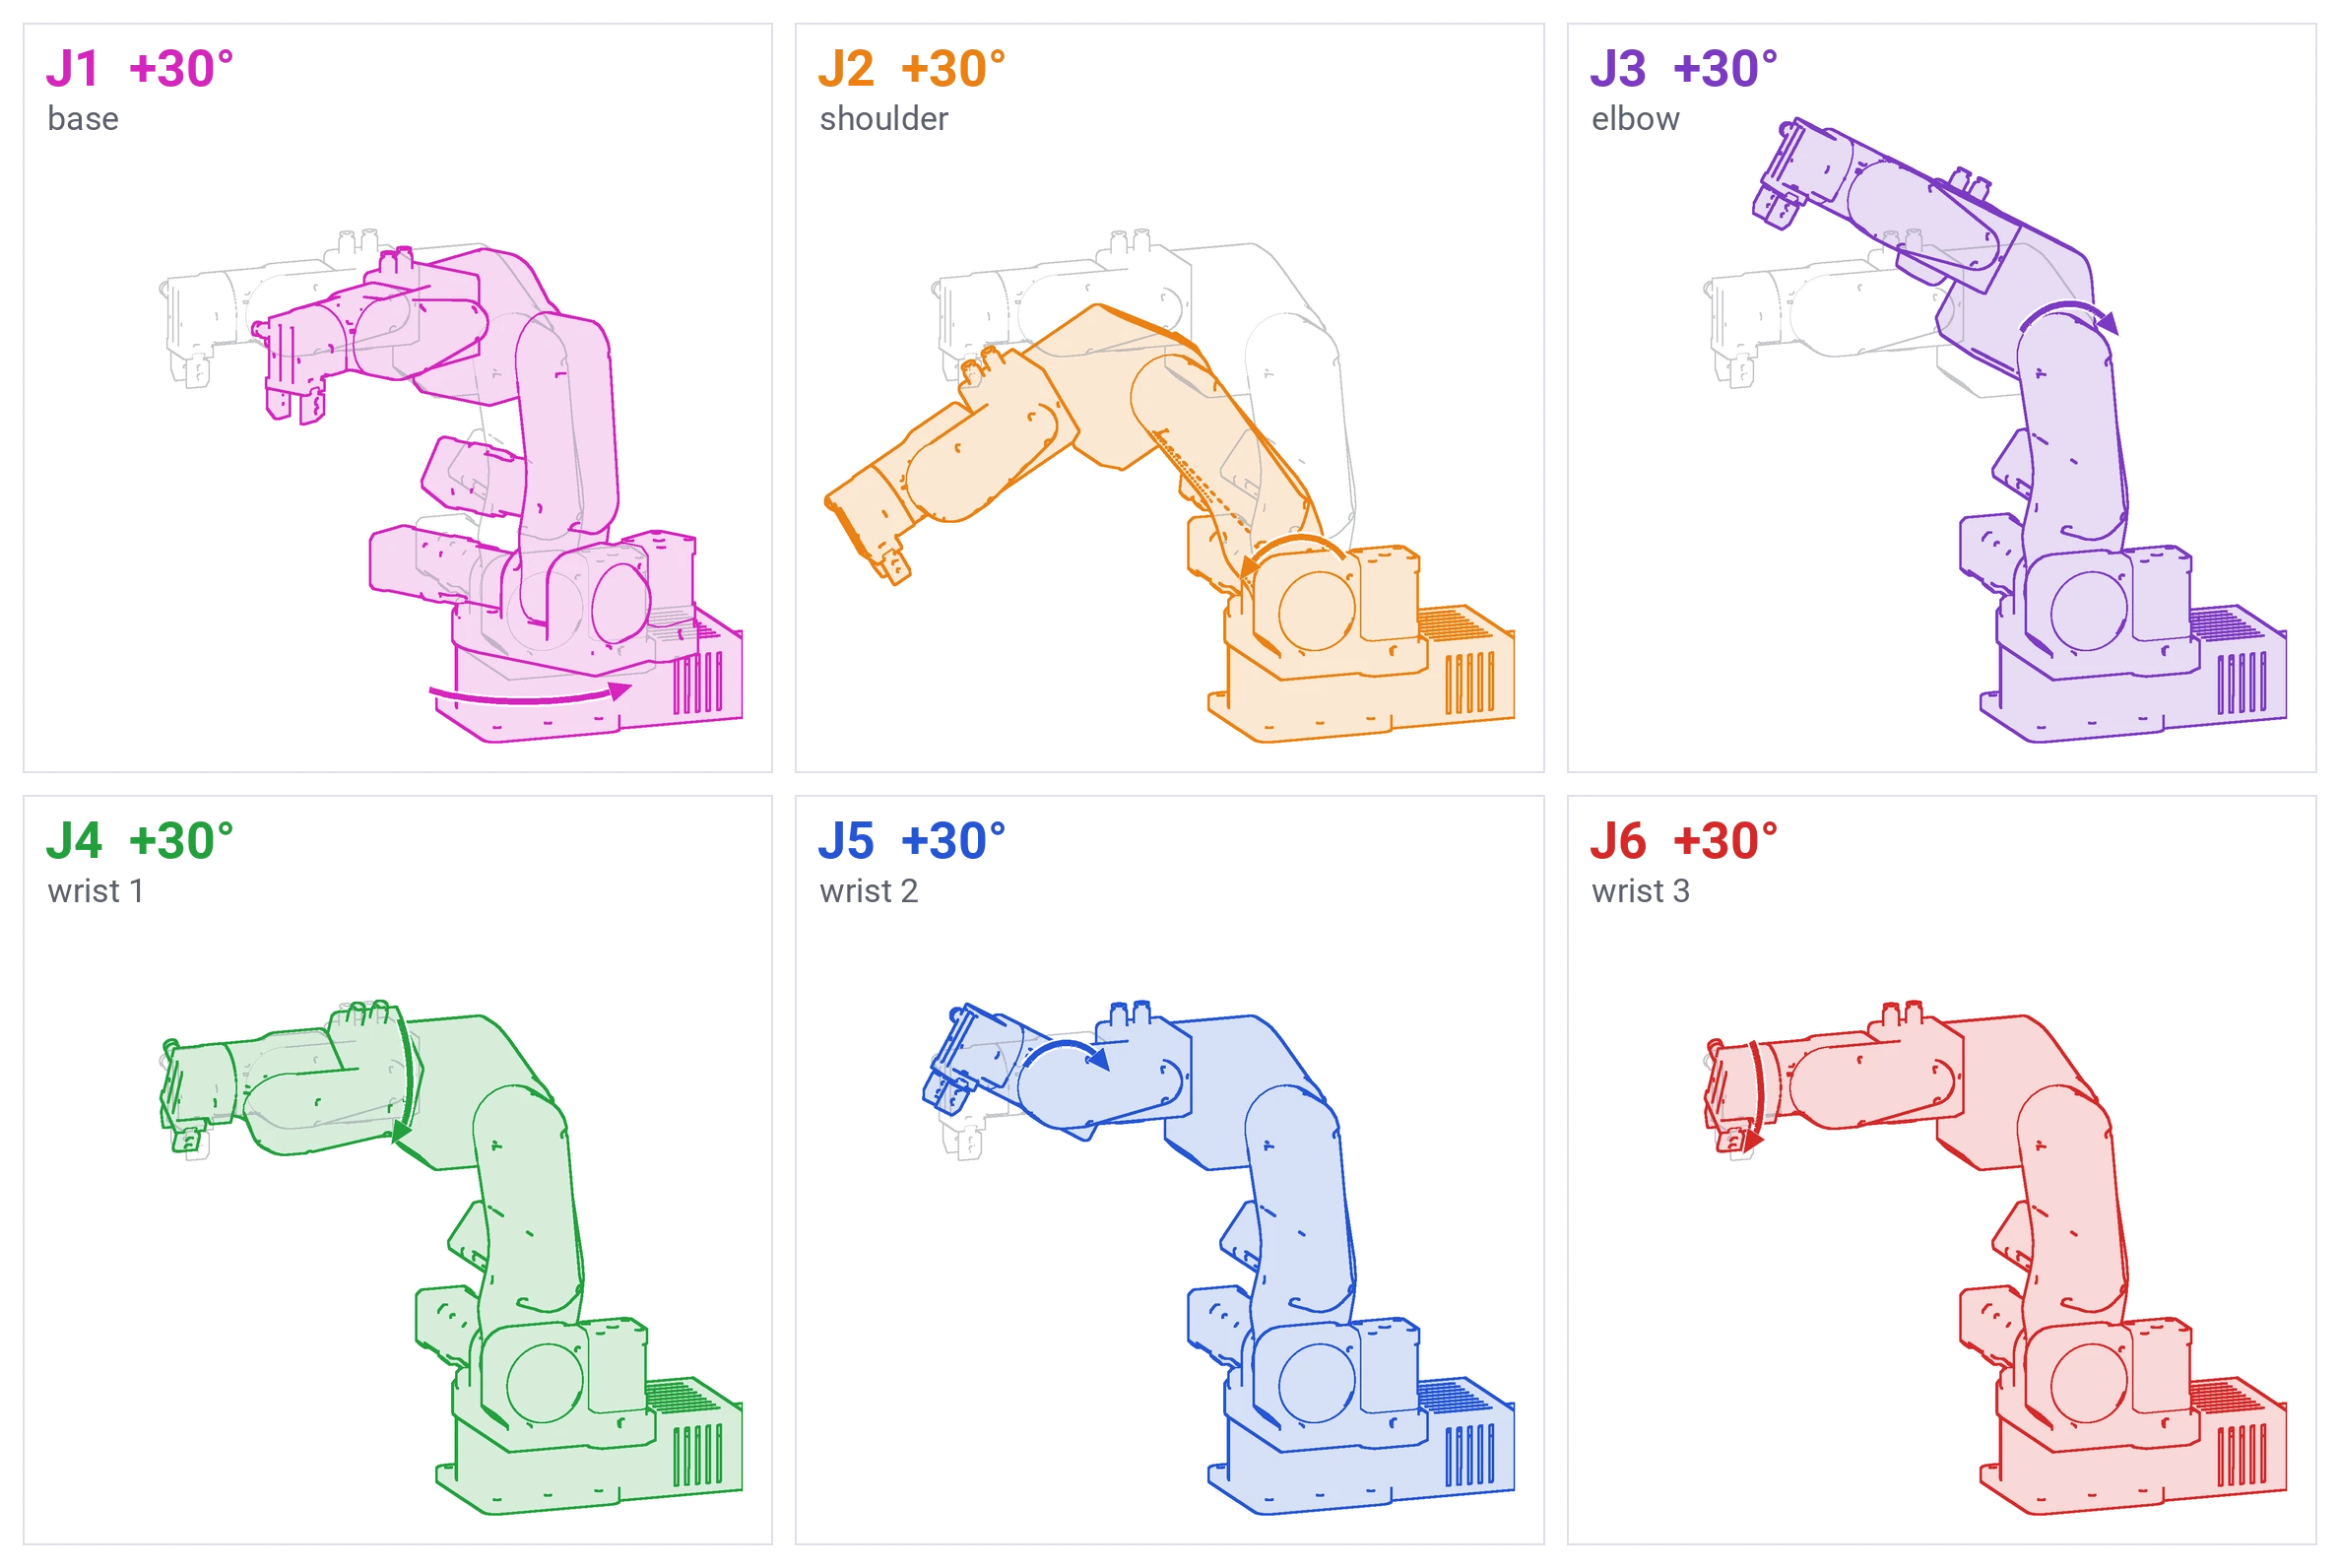
Before homing, both programs check each jog against the joint limits with a position count that starts at 0 when the board is switched on. That count puts joint 2 past its positive limit and joints 3 and 6 at or below their negative limits. So, until the robot is homed:
- Joint 2 jogs only in its negative direction. Check that it turns opposite to the figure.
- Joints 3 and 6 jog only in their positive direction, which is the one to check.
- Joints 1, 4 and 5 jog both ways.
A refused jog does not move: the commander logs Error: Robot jog -> Position out of range, the Python API
stops the joint before it starts.
In the Joint jog menu, press the left arrow (positive) of joints 1 and 3 to 6 briefly, and the right arrow (negative) of joint 2.
A joint that turns the wrong way is fixed in the firmware, not by trial: Firmware and first run.
Read in more detail: Jogging · Joint limits and directions.
Check
Joints 1 and 3 to 6 turned the way the figure shows, and joint 2 turned the opposite way on its negative jog. If one did not, fix it before you home: A joint turns the wrong way.
10. Home
Homing finds each joint's reference at its limit switch or sensor. Joints 1, 2 and 3 move to their switches together, then 4, then 6, then 5, and the arm ends in the after-homing pose: the standby pose turned 90° about joint 1. Stay at the E-stop: a joint that grinds at its end stop has a switch that does not trigger.
Before you press Home:
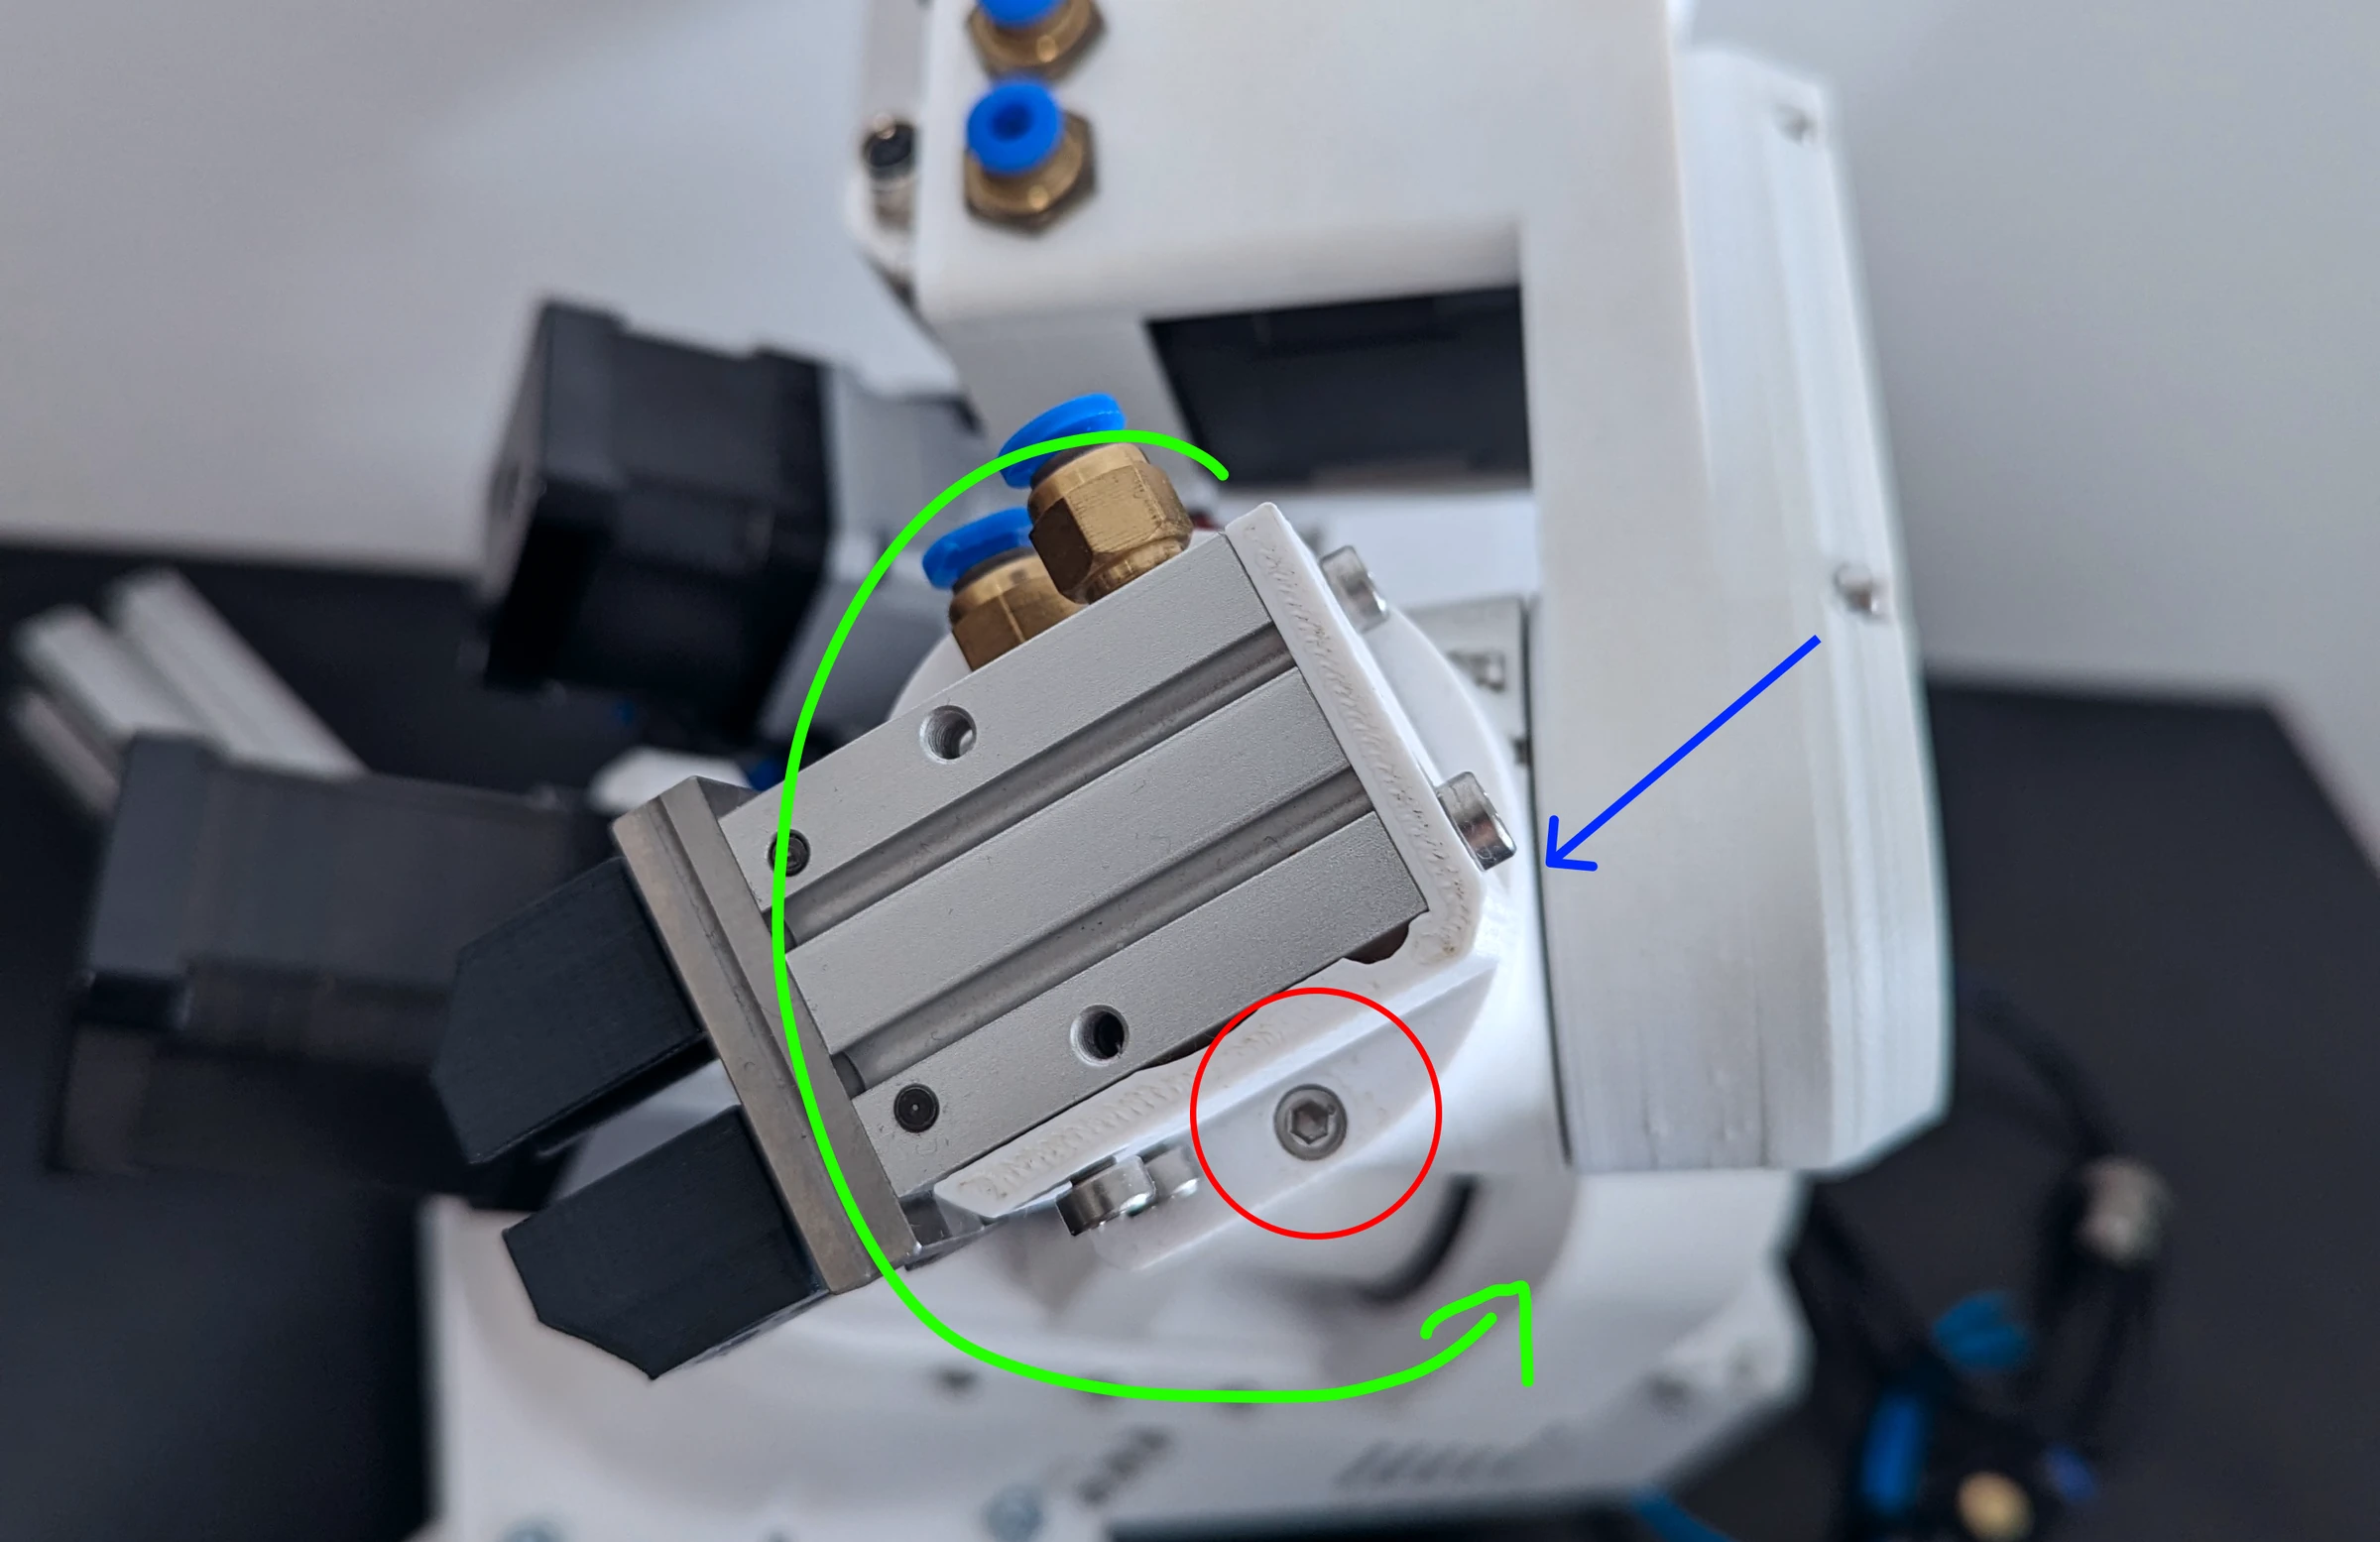
- Joint 6 stands so that it finds its sensor within one turn in the negative direction, with the tool's cables and tubes not wound up. The figure shows the pose: the gripper as drawn, the sensor (blue) and the homing pin (red); joint 6 turns along the green arrow.
- The tool is mounted, and the firmware's joint 5 homing offset matches it. Joint 5 homes against a feature
of the tool holder;
j5_homing_offsetinmain.cppis 8900 for the pneumatic gripper holder (as shipped) and 8035 for the SSG-48. If you change it, upload the firmware again as in step 4 (Joint 5 and the tool).
Read in more detail: Homing · Homing failures.
Check
Homing finishes, the physical arm matches the simulator, and the pin passes through the witness marks of each joint, which line up in the after-homing pose (Witness marks). If a joint keeps travelling or the pose is wrong, stop and use Homing failures.
11. Move it
The robot now knows where it is. Three simple moves: bend the arm a little, turn the base, and come back. The Python API adds a short straight line down and up from the bent pose.
Paste this program into the program window and press Start; Stop halts it.
Begin()
MoveJoint(90,-70,160,0,30,180,t=3)
Delay(1)
MoveJoint(60,-70,160,0,30,180,t=3)
Delay(1)
MoveJoint(90,-90,180,0,0,180,t=3)
End()
MoveJoint takes the six joint angles in degrees; t=3 makes the move take three seconds. Jogging in the
Cartesian jog menu moves the tool in straight lines instead.
Type these lines at the >>> prompt, one at a time; each waits until its move is done:
rbt.move_j([90, -70, 160, 0, 30, 180], speed=0.3)       # bend the arm: six joint angles in degrees
rbt.move_l([0, 0, -30, 0, 0, 0], rel=True, speed=0.3)   # a straight line 30 mm down
rbt.move_l([0, 0, 30, 0, 0, 0], rel=True, speed=0.3)    # and 30 mm back up
rbt.move_j([60, -70, 160, 0, 30, 180], speed=0.3)       # turn the base
rbt.move_j([90, -90, 180, 0, 0, 180], speed=0.3)        # back to the after-homing pose
speed is a fraction of the maximum: 0.3 is gentle. With rel=True, move_l takes a change from where the
tool is: x, y and z in mm in the world frame, then three rotations in degrees.
Read in more detail: RBTscript · The Python API.
12. Switch off
Bring the arm to the parked pose first, folded in over the base, so that it has the least distance to fall:
Then hold the forearm and press the power button. The arm goes limp the moment the motors lose power.
13. Where to go next
| You want to | Read |
|---|---|
| attach a gripper | End effectors |
| write programs | Programming, RBTscript, The Python API |
| use inputs, outputs, pneumatics | Peripherals |
| understand what the robot does and does not protect against | Safety functions |
| fix something | Troubleshooting |
| look up a command | API reference |
Comments
Found a mistake on this page? Edit it on GitHub · Report it · Get help · This page as Markdown · llms.txt · The whole manual as PDF