Current limit and loop tuning
Calibration leaves the driver with current loop gains computed for your motor and with conservative velocity and position gains. Two things remain: the current limit, which you must set for your motor, and the loop gains, which you tune if the defaults do not suit it. Motor GUI shows the motor's response on its plots while you change a gain, which is what makes tuning quick.
The current limit
Set the current limit to the rated phase current of your motor in mA, after every calibration: calibration
leaves the limit at 1600 mA. The factory default (#Default) of 1000 mA suits the gimbal motors in
Tested motors; a motor rated for more can go up to the driver's 2800 mA.
#Ilim clamps the limit to 2800 mA; Send_Limits over CAN does not, so never send more. The firmware does not trip
on phase current by itself; the MOSFET driver's hardware protection only catches a hard fault. A limit above the
motor's rating overheats the motor.
Crunching and whining sounds at speed usually mean the current limit, or the current loop gains, are too high.
The loops
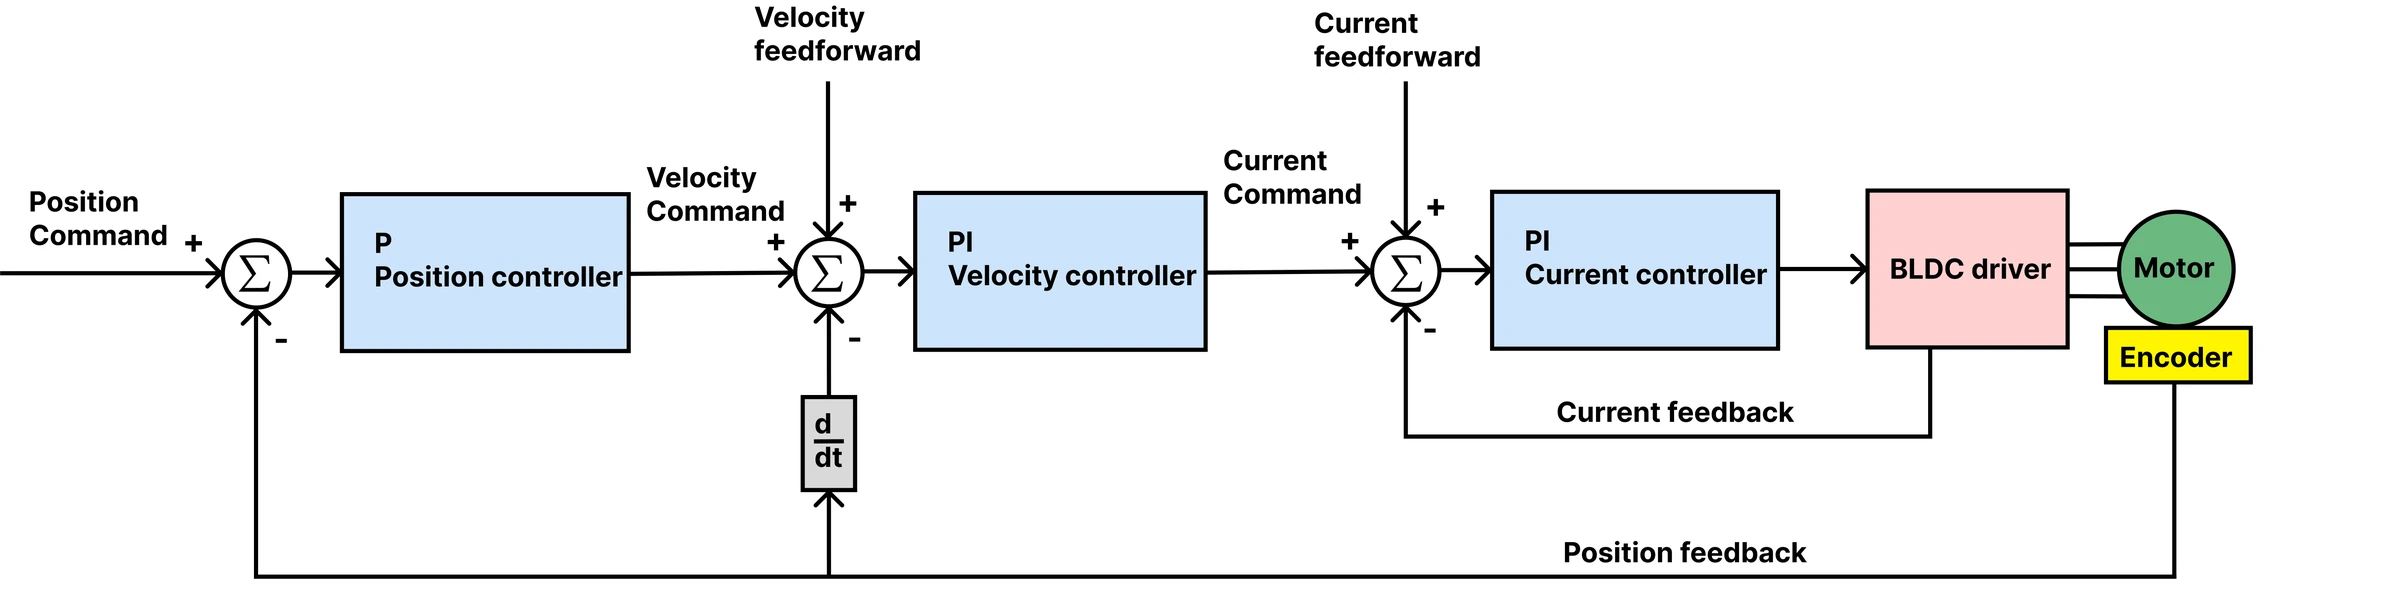
Tune from the inside out: the current loop first, then velocity, then position. Before you start:
- The motor must be calibrated and without active errors; the driver refuses the control modes otherwise.
- Fix the motor to the bench, nothing on the shaft. A loop that oscillates can shake a loose motor off the table.
- If the defaults oscillate, lower all gains until the motor is quiet, then raise them one at a time in small steps.
The gains are in the settings: change one, Apply gains, command a move with the jog controls and read the response on the plots. Apply preset loads a starting set for a kind of motor. Save when you are done.
Each gain is a command: #Kpiq 0.5, #Kpv 0.02, …, then #Save. Command a move with #Iq, #V or #P
and judge the response by ear and by #Cyc 20, which streams position, speed and current.
The current loop
The current loop is a PI controller that turns a current request into a voltage. Calibration sets its gains
Kpiq and Kiiq from the motor's resistance and inductance and the bandwidth (#Cbw, 500 Hz by default; set it
before calibrating). These computed gains suit most gimbal motors; tune by hand if the motor hums or responds slowly:
- Raise
Kpiquntil the motor starts to hum or oscillate, then back off 20 %. - Raise
Kiiqthe same way, then back off a little. - Test with a current setpoint of a few hundred mA (Jog current, or
#Iq 300): the motor should push with a steady, quiet torque. Keep the current well under the limit.
A higher bandwidth responds faster to a disturbance and is louder; 800 Hz and more is common in industry, and useful for legged robots.
The velocity loop
- Raise
Kpvuntil the motor oscillates at a steady speed command, then back off 20 %. - Raise
Kivslowly until it oscillates, then back off a little.Kivis an integrator: too much makes the motor unstable, none leaves a steady-state error. - Test with a speed setpoint (Jog velocity, or
#V 20000; 16384 ticks per second is one revolution per second) and with different speeds.
The position loop
- Raise
Kppuntil the motor overshoots or oscillates when it reaches a target, then back off. - Test with a position step (Jog position, or
#P 16384and#P 0): one revolution and back. The response should be quick, without overshoot; the plot shows both.
Testing
Run the motor over the whole range of speeds and loads it will see, with a load if you can, and adjust. Then save.
Impedance (PD) mode
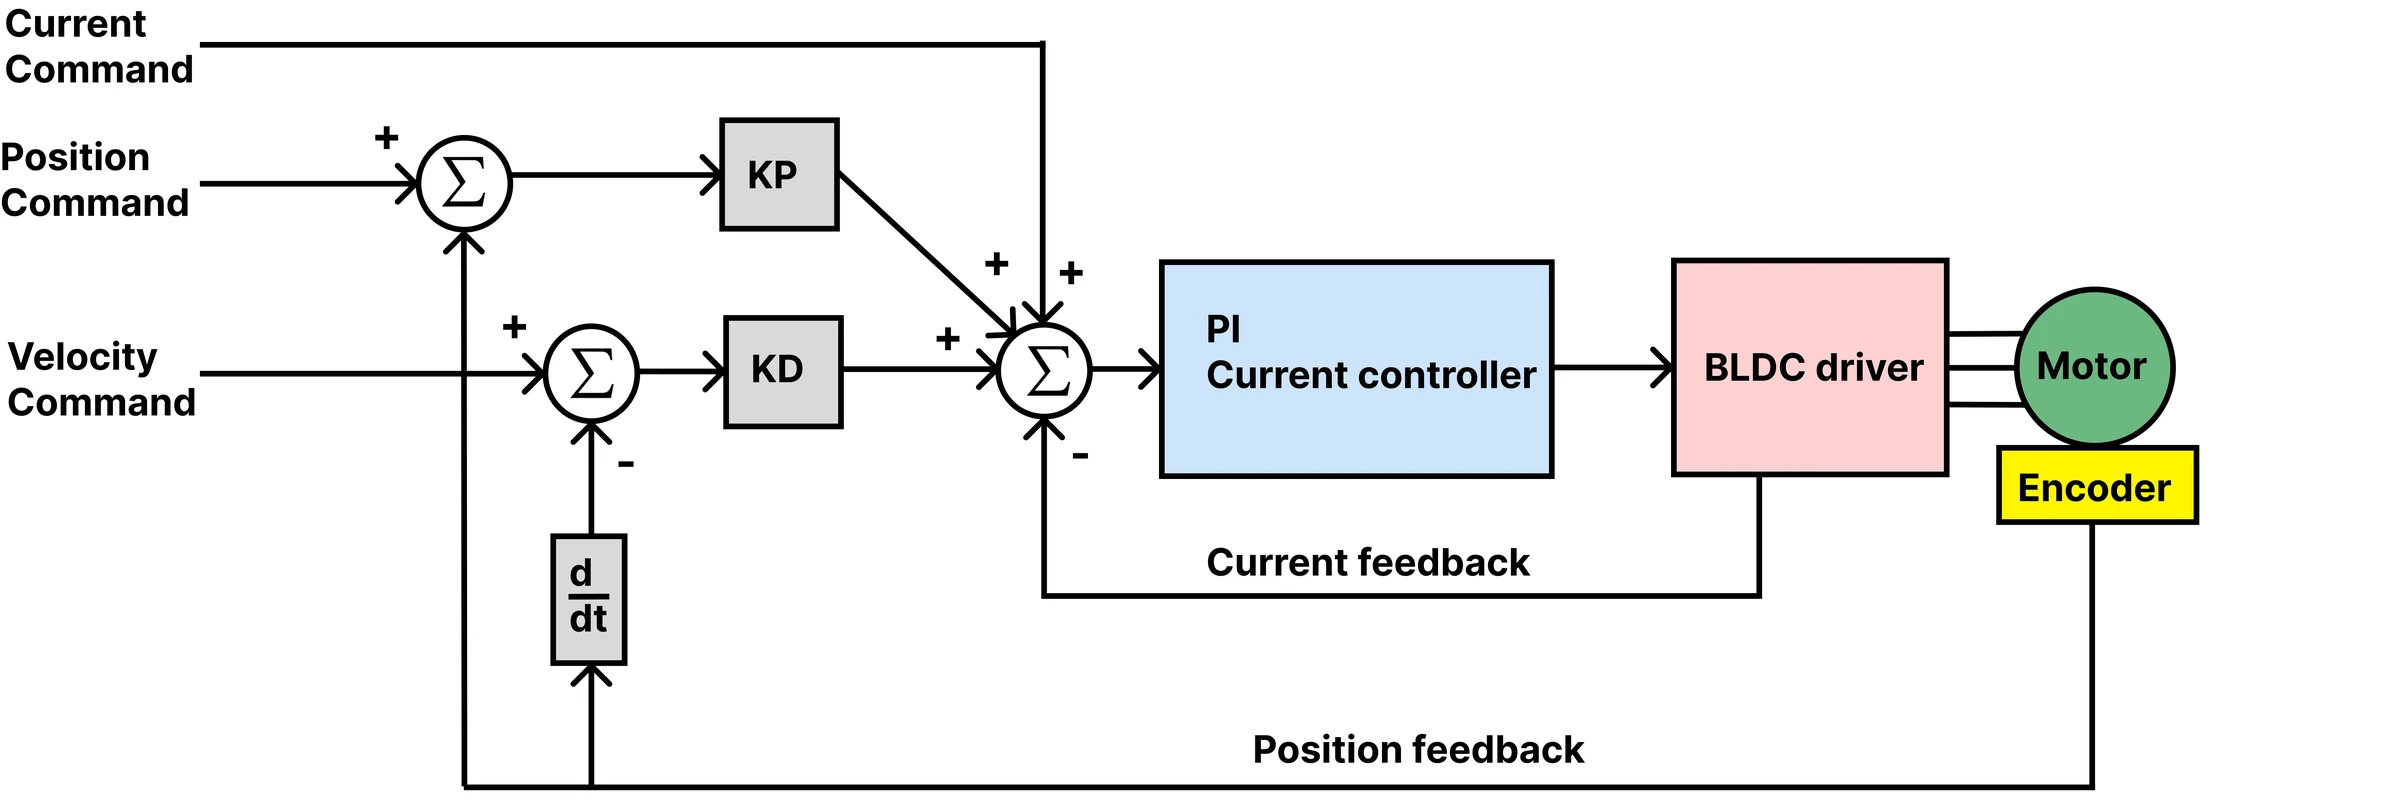
In PD mode the motor behaves like a spring and a damper: the torque is KP × (setpoint − position) + KD × (speed
setpoint − speed) + feedforward current. Set KP and KD (the gains, or #KP, #KD, or Send_PD_Gains), then
command with #PD, #PDV and #PDI or Send_data_pack_PD. Start with a small KP and KD of 0, raise KP until
the motor holds position firmly, then add KD until it stops ringing. The theory corner
explains the loop.
Limits
- The velocity limit (
#Vlimit) clamps the speed the loops may command, in encoder ticks per second. A rough maximum for your motor is 0.8 × Vbus × KV × 16384 / 60 ticks per second, with KV from calibration. - The voltage limit (
#Vlim) clamps the voltage of the current loops in mV; 0 uses the supply voltage. #Rstint 1resets the integrators on every new setpoint, which avoids windup when a program sends one setpoint after another with large steps.
Comments
Found a mistake on this page? Edit it on GitHub · Report it · Get help · This page as Markdown · llms.txt · The whole manual as PDF